Friday 26 February 2016

Greying:

Greying: Hair 

During this practice I have been taught a great technique to create greying hair in a very simple way. I needed to create my character to look a bit older so therefore by using this simple technique I will make my character appear older than my model is. As I am using a male model I was worried about the lack of techniques used on my model but but learning this will add an extra theme to them. 

Kits:
- Hair brush 
- comb 
- dry Shampoo

Greying: 


I started off with clean hair and brushed out all the knocks and by using this simple technique I created a greying hair look. I took some dry shampoo and sprayed it through the roots of the hair creating a very white root. I then took a thin pin tale comb and combed this through the hair. By using a thin comb this creates a sort of highlighted grey hair rather than all over the hair. This technique is very effective for a quick ageing look that can make your character appear older. I would like to use this technique within my character as my model is a lot younger than my character is meaning this will help create a slightly more aged look.


Tuesday 23 February 2016

Make-up In Motion: Dirt and Stained teeth

Dirt and Stained Teeth

In this blog I will be writing about the process of producing a dirty mud look and stained teeth using make-up. These kinds of techniques are used in all medias such as film, TV and theater to create a realistic. These kinds of techniques can be used towards the ideas of my characters and I founds these techniques very useful as they could be used to create a different kind of character only by changing small elements of the body. 

Kits:

- Barrier cream
- fullers earth (dirt)
- watered down blood
- Coloured bodies/hair spray
- cotton buds
- Kylon Teeth enamel
- Circuital spirit
- hair dryer


Stained Teeth and Dirt:


In this look I wanted to start off by creating stained teeth. To start this look I took a clean cotton bud and while having my client open their mouth I rubbed this over the teeth making them dry. While doing this look the client has to keep their mouth open as the teeth have to stay dry. I took the 'Kylon' black and yellow teeth enamel and using a clean cotton bud I first placed the black teeth enamel on the teeth. As I found the product did dry very quickly which was quite useful as when adding the next yellow layer it was easy to work with as it would not smudge. I was very pleased with the finished look with the teeth as it really changed the appearance of the person which could really help when transforming a character design. To remove the tooth enamel you take a clean cotton wool bud and dipping it into circuital spirit this will take it right off the teeth without causing any damage (to note - make sure this product is not consumed). However, when taking off the product it can create another good look of decaying teeth at the earlier stages which may look not as severe as this look shown in the pictures. I was also working with a new product called 'fullers earth' which is a make-up product that looks like dirt but is safe and clean to apply to the body. I wanted to create a dirty look on the face and by adding a little bit of water to the product and using my fingers I placed it on the face where I desired, as this is meant to look dirty and messy you don't need to worry about the placement of the dirt. To finish off this part of the look I also used a body spray product in the shade brown to give it a deeper tone of colour and finally added a mix of blood and water spray to the face.  


 Dirt Hands:


 I continued this look on the hands as I believe this kind of technique would be used more on this body part. I started with clean hands and while using the 'fuller earth' I added water to the product and got my model to rub their hands together. To then create the cracked effect I used a hair dryer on a cool heat to create this look. In the second photo below to create to colouring I used a brown body spray to make the colour darker and more like mud. To finally finish the look I used the mix of blood and water I sprayed it onto the hands, making it appear as if someone has fallen over and cut their hands.   


Sunday 21 February 2016

Make-up and Illness:

Fevers, Black eyes, redness, Bruises and Sweat

In this blog I am writing about new different make-up that I have learnt that could be used in my designs for my character. This lesson was about learning how to make in-perfection on a character like; fever, redness in red, tired eyes, sweat, black eye etc. I feel that some aspects of these make-up technique can be appropriate for my character. He is like a mad professor and I would like to use dark tired eyes to highlight stress and worry of his transformation changes to Mr. Hyde and also the redness to the face may express this even further.


Sweat, Tired eye and Redness:

Kits:
- Supercolour
- stipple sponge
- Glycerin
- Thin angled brush
- powder
- Moisturizer
- old brushes 

To start this Make-up look you have to make sure that the face is clean therefore I started with a clean face and moisturized it. Then by mapping out the areas of the face that would become red when tired e.g. apples of the cheeks, tip of nose, top of the ears and forehead and using a stipple sponge and red supercolour I stippled it on these areas of the face. Next to create a tired eye I blended out a tiny bit of black supercolour in the corner of the eye and then blended out different shades of red around the eye (can use eye-shadows if prefer). Also if the product is quite thick and does not blend out you can use the moisturizer to blend it out and to look more realistic or even put Vaseline around the eye to make it appear more swollen. I also used a small detail brush and used light red and blue supercolour to draw on little vain line under the eye to make it look more tired and irritated under the eye. To finish off the fever look I wanted to make my model look like she was over-heating I wanted to create sweat and a runny nose, therefore I used glycerin medicine (which is great for the skin). This product is clear but also quite thick so it stays on the skin and is great to create realistic sweat. I place the glycerin (with a stipple sponge) around the sides of the forehead and also pushed it back into the hairline and then put some under the nose to create a runny nose. 


Black Eye and Bruises:

To create the bruised eye and a bruised arm you will use the same tools and product but in slightly different ways.  To start with the base I took the yellow from the supercolour pallet and then a little green made dapped this all around the arm area and below the eye. This makes the bruise look a bit older.  I then used colours like;  dark and light red, purple, brown etc. This method has no instructions I would recommend to follow an example of a real bruise and copy the colour to try and achieve the most realistic look.  


Other Ideas:

- To create a different kind of fever like the red skin you can add to this by flicking different shades of red supercolour mixed with alcohol on the skin. This kind of look will make it appear more rash like and irritated on the skin.

- Could consider the whole body the hand and upper body. Could have a fever growing up the body, cuts, bruises etc. 

- Can add eye drops to make eyes look watery and either use a red eye pencil in the water line to create a irritated eye. 

- For chapped lips you can get your model to screw up their lips and put latex over them and wit till it drys. When drys this would make the lips appear cracked and for extra you could add a little bit of blood to make them look like they are bleeding.    


Reflect:

To reflect over the whole look I would really like to use the redness under the eyes to express my characters stress. I really like the idea of the stress veins as well to further add to the pressure and strain of the character. I may use the glycerin to create sweat but I am unsure on what to create. I will show this later in my designs for my character as I would like to create something that represents growth and change. 


Saturday 20 February 2016

Development of Ideas:

Researching and Designing into the Character

To continue my research into my character I have decided to refer back to my blog post on 'creating characters' and I thought it would be appropriate to re-research into each point about my character to gain a better understanding about its background. I will be researching into the; background, story, status, characteristics, personalty, state of mind etc. 


Background/story:

In the background and story of this character it starts with a respectable doctor (Dr. Jekyll) who transforms into a savage murderer (Mr. Hyde) by the experimentation of science. Dr.Jekyll wishes to be able to separate his good from evil and be able to turn into pure evil without feeling the guilt of a good person. The story consists of Dr.Jekyll transforming between characters without anyone knowing that they are the same person, Mr. Hyde continues to do bad things and then the tale ends with the discovery of their scientific secret and ends with Dr.Jekyll committing suicide due to losing control over his other evil half.


Status: 

As the character is represent in the novel as two people they both present us with two different status values within the novel. Dr. Jekyll is represent as a respectable gentleman of science and discovery, as this was/is considered a intelligent profession he was considered of a high class as he also did many work for charity. However, Mr.Hyde (his bad half) is seen by the town as inhuman and ape like therefore they do not accept his difference and considered lower class.  


Characteristic's/Personality:

Dr.Jekyll is considered a respectable gentleman in his local area due to his work within science but Mr. Hyde is considered a threat and a freak to locals as he does not look like everyone else and is not considered normal. Dr.Jekyll is considered a higher status due to his work ethic and Hyde is considered a low life as he is different from everyone else and different was not considered normal. 
As there are one characters that are split within two characters I have found quoted from 'Robert Louis Stevenson, The strange Case of Dr.Jekyll and Mr.Hyde'. 

Dr.Jekyll: 'is a tall, a commanding figure, of considerable intellect and good social and professional standing, dedicated to the advancement of science and learning'. 

Mr.Hyde:' Is a small, often described even as 'dwarfish' and 'ape-like' as if physical stature of the man reflected his lower moral standards. 

- 'Jekyll feels he can keep Hyde under control, and has considerable moral scruples when he feels Hyde taking him over. Hyde never expresses any moral viewpoint; he simply acts as his feeling lead him'. 


Planning Ideas: 

After starting the initial research I have found out more information about the characters ans their background story. Therefore I wanted to takes this information about the characters and incorporate this into my designs and to start this process again I researched into inspirational images that relate to the ideas of these characters.


  During the process of researching into inspirational images I found that their was a big theme of half and half faces which represented the two characters within one person. I really like this idea as in the novel the characters are shown as two people until they are discovered as one, I think it would be a great idea to show the both characters as one to represent the contrast in both sides of the characters themselves. As we are doing 'Continuity' as the main bases of the exam I needed to create a design that I was able to achieve actually the same for both exams with also making it relate well to my character. My first thoughts on a character design was inspired by the end of the novel when Mr. Utterson is reading the letter from Dr.Jekyll about his struggle between the switch between his other self (Mr. Hyde) which is when Mr. Utterson and everyone finds out they were the same person. The novel goes on to further explain that Dr.Jekyll no longer had control over his other self (Mr, Hyde) and he was transforming into him without any control, as he knew he was doing bad he decided it was enough. Therefore Dr. Jekyll committed suicide fighting against his transformation. I wanted to represent this struggle at the end of the novel of the two sides of the character fighting against each other. Therefore inspired by my image research I further mind-mapped and planned more ideas (shown below).


As I have planned more into my ideas I wanted to start drawing out design ideas and researching into the background of them. The main theme for my ideas are definitely based on two halves and the aspect of not being in control. As my character is a scientist this was considered a new form as in the Victorian era the 'Industrial Revolution' was happening making people very unsure of the sciences and anything new as, as humans we are creatures who don't like change. Religion was the main belief for most people in the Victorian period and Praia to that therefore the forms of  science made people unsure and this is why the character of Mr.Hyde was also judge as he was different and new as well. I want to represent this theme of the unknown in my character as again my character did not always know when he was to transform making this a big theme of the novel. 


Creating Characters:

Dr.Jekyll and Mt.Hyde

In this blog I will be writing about the creation of Characters and how we determined their design. As I am studying the book of Dr. Jekyll and Mr. Hyde I will have to know many aspects of this character to design my own interpretation. Therefore there are certain elements that I need to know about my character to develop its appearance like; background story, status, characteristics, personality, state of mind and attitudes. These are the elements I will need to research and state to continue the development in my character and its design. To understand the grasp of how design work and the understanding of a characters looks/personalities goes into it we looked at a video called 'Clevver Movies' which showed a character from the 'Harry Potter' films explaining the development of his character over the seven films.

The short clip from the link above was showing the actor Jason Issacs who  plays the character 'Lucius Malfoy' which through the clip he explains the role of his character but also how he has changed over time through the novel through experiences. His character always wanted to be powerful but is undermined by 'Lord Voldamort' and his great powers. He wishes to portray himself as great and powerful as he works beside the great lord but small elements of cowardliness shows the audience that he is scared and afraid. This small clip can help me as I need to understand how the story line and plot will reflect on my characters appearance as 'Lucius Malfoy' first is seen as a clean well dressed character compared to the end of the novel when he looks tired, messy and has grown a beard representing to the audience that he has gone through traumatic times.


Does Design Matter?:

In this video 'Does Design Matter' we look at something a bit different from the previous video but also similar. We are informed in this video that relations between stereotypes is an aspect that can block a lot of designers thoughts when creating a new character. The man states when he is teaching the younger/next generation this ideas of stereotypes is something that has to be ignored as otherwise a lot of female gaming characters can be built in a very sexual way e.g. big chests, small weights and revealing outfits. Therefore as any kind of designer the message is to think past what has already been done, adapt it and make it better. I found that when designing that it is OK to take inspiration from others and their work but as long as you make the design your own. Another thought gathered from this is that the audience needs to connect with the characters that you create and when these stereotypes have been over done many times this can create insecurities for young generation therefore the aim is to connect with whatever target audience on an emotional level in a positive way, this is considered a primary goal.


Therefore the design process for anything or any aspect of planning is always very important if you want it to achieve as 'failing to plan, is planning to fail'. The research and background evaluation into the character you wish to design is vital as one tiny detail could help you expand on a final design. As I am planning my own character I will take every aspect from this piece of writing and show through my work my development of work that I wish to achieve in my character. The key aspect for this unit is 'continuity' making sure that we can repeat the same designs and repeat them. This aspect will be a great challenge in achieving my work and so the design process is very important as they will act as my instructions in repeating the same look for my final character. To continue this blog I will be researching further into the background of my character to fully understand my elements that I can develop further into. Continuity is very important in Tv and Film as any mistake can be seen if not done correctly and this skill is extremely important for me to learn as if I was working within this industry I would HAVE to make sure the costume and make-up was exactly the same. To show bad mistake that have happened I watch ' Biggest Movie Mistakes' which is a prime example of why everything has to be perfect to make a TV series or Film as this make it realistic to the audience. To finish the blog to link to the theme of continuity I practiced a piece of my own work by repeating the same make-up look on my own face and then repeating it to see how easy it is to achieve.

 Attempt One:
In my first attempt I used a pink Dior lipstick and lined my lips and then patted on with my finger a light pink glitter. As this was quite a simple lip I new it would be quite easy to re-create. To practice the continuity practice I then took of the lipstick and then repeated the look. When I repeated the look it does look pretty much the same but while comparing the two images I did slightly over line the lips making it not match. Therefore I have learnt that you need to take your time and always have a reference image in front of me to help keep them the same.  


Sunday 14 February 2016

Late Victorian Hair

Late Victorian Hair (1860-1900)

In this blog I will be writing about the hairstyles of the late Victorian period as to continue from the early Victorian hairstyles in my previous hair blog. I am studying into these types of hairstyles due to this unit my book is set in the Victorian times and this will then help me with my further inspiration and studies. 

Women's Hair: 

  • !861-65's: Hair was starting to be pulled back in loose plaits rather than looping in round the ear (like the previous hair blog) as this hair style was more practical for women due to the war. The plaits also provide a extra texture to the hairstyle without making it to complex.
  • 1870's: The hair has become a lot longer and past the traditional length of past the chin meaning more women wore their hair down. However, most women would still have pasts of their hair half up in long tight curls and large front hair pieces. The hair at the front was not as pulled back but more loose like the back of the hair and the new trend was wearing extravagant hair pieces and accessories e.g. Alice bands, flowers etc.  
  • 1880's: As the hairs styles were getting higher on the head due to the pin half up half down curls the fashion of big head dresses came into fashion which many had adapted to fit around the hairstyles.
  • Other famous examples of these hairstyles inlcuded within film were worn by a young girl called 'Alice Liddell' who played the famous character 'Alice in Wonderland' by Lewis Carroll. The examples of these hair styles are used nowadays as well being used in period dramas and films of today. 

Men's Hair:

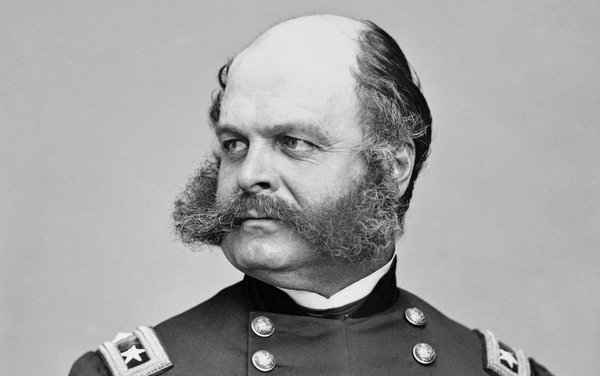
  • 1861-65: Was the period of the American civil war and was lead by a famous General, General Burnside which is to believed to of founded the idea of side burns due to his very prominent side burns. This was also used as a practical aspect as to keep the men's faces warm from the cold and also as it was hard to get hold of all shaving equipment during the war.
  • Another famous icon was a man called 'Charles Dickens' he was known for his famous novels and of course his facial hair as he was believed to be very proud of this.  


Victorian Inspire Up/Down Hairstyle:

As inspired my the research we where taught during our practical hair lesson we were going to create our own versions of the half up and half down curls. As we know the hair has to be neat at the front while the back of the hair has to flow like a waterfall down the back of the head with tight curls and ringlets. As in the Victorian era they would have had different methods of curling their hair but for this practical I have used more modern methods as hot curlers and curling tongs. 

1. To start this look I have sectioned the hair into a center parting but stopped around the middle of the head making two square sections at the front of the head. With the rest of the hair at the back of the head I have taken a hair tie and tied it in a simple ponytail in the center of the back of the head, prepping me for the next step. 


2. Then using the pre-heated hot rollers I took of one of the front sections I sectioned in the first step. Taking this section of hair I then sectioned this into two, horizontally Using the bottom half of this section I then section that into two the same vertically and then I took a white hot roller and rolled this along the hair (underneath) and then pinned it into place with a white grip. I then did the same to the other bottom section. Then using the top section I split that into two sections (horizontally) and then taking a white hot roller for both sections I rolled it on the hair and pinned both into place using a white grip (shown in the picture above). To finish this part I did the same to the other side of the head with the front section and left in to set while I continued to the next step.

3. In the third step I was working with the back section of the head that we put into a ponytail. Using the ponytail I took this out and made two ponytails, having one above the other. Using the bottom ponytail I used a curling tong and curled the entire section of the hair in tight curls. However as my client has very long hair I did struggle to make the curl very tight as the curls where pulled down by the weight of the hair. When the bottom part of the ponytail was finished I started curling the top section of the hair the same as the bottom. However when I curled the hair with some of them I would make into ringlets and pin them into place at the top of the head, therefore making a waterfall effect. This technique can be as random as you like as you can make tight ringlets or have loose curls hanging down.I continued this technique until I was happy with my final outcome. 


4. In this step I returned to the front of the hair and taking out the bottom sections of the front sections I pulled back this section together to make it flat and with the rest of the curls pinned this within the back section of the hair. Which I then did this to the other side to make them match and make the hair look neater. With the top parts of the front section as the hot rolls had created a cow lick on both side I pinned these both over toward the back of the hair while trying to keep this cow's lick shape at the front of the head. But again as the hair was so long and thick the hot rollers had not been able to achieve as much fullness to the front of the hair as I would have liked. To improve on this I would have used bigger hot rollers on the top part sections at the front of the head as this may achieve larger cow's lick that would have set within such long hair. 


5. This had created the final and finished look for the Victorian style. I believed I achieved this look quite well considering I did fine that some parts did not work due to the heavy and long hair type. However, with the back section of the hair to improve I would take the sections of hair that were pulled back at the front of the hair and pin those within the back section to make the whole hair flow better. I really enjoyed creating this look as I have learnt a new style for this era but I will be using something very different in my final design as I am working on a male model.

Burns

Make-up: How to Make Fake Burns

In this blog I am writing about the process of making your own SFX burns for TV and Films. In this lesson I learnt about the correct materials to use to produce a SFX burn in the professional place, how to colour it properly to make it look realistic and to always have a reference picture of the type of burn you are trying to produce in front of you. When making your own burn that is one of the most important rules to know how the burn was cause (for TV/film purpose), therefore to know what the burn will have to look like to make it realistic. As this is key to know for the industry I thought it would be appropriate to research into different kinds of burns e.g. first, second and third degree to give some examples. 

Your bodies biggest organ is the skin and is vital to the human body as it carries out very important functions in the body e.g. protecting vital internal organs and tissues, acts against infection and detects sensations like touch, pain, heat and cold. 'The skin is made up if three layers. The outer layer is called epidermis and is made up of five layers of cells which work their way up to the surface of your skin. The dermis (which is an underlying layer of fibrous tissue) is approximately  0.3-3mm thick. This is made up of a mix of three types of tissue. It also contains your hair follicles and sweat glands, as well as small blood vessels and nerves.The final layer is the subcutaneous fat or subcutis. This layer varies in thickness depending on the person. The subcutis contains your larger blood vessels and nerves. It also regulates the temperature of your skin and body.' ( BlondMcindoe, research Foundation). 


First Degree Burns:

- First degree burns only affect the outer layers of the skin and usually cause pain, redness and sometimes swelling in the skin. These kinds of burns usually fade after a while as it only effects the top layer of the skin. When creating this kind of burn with make-up you always have to consider the type of first degree burn you wish to create e.g. like this sunburn shown below we can see that the person was wearing a vest top and when creating your own with make-up for film the type of clothing and length of time in the sun is something you would have to highly consider. For an example of how to create a make-up sunburn I have linked in this tutorial on how to create your own called ' Extreme Sunburn Make-up Tutorial (SFX!) QueenKingSFX'. This technique will be helpful for the future but it is not an appropriate  technique for my character that I am going to create from my novel.   


Second Degree Burns: 

- Second degree burns affect the outer layer like first degree burn but as well affect the underlying layer of skin. They cause similar symptom  like pain, redness, swelling but also blistering. It can sometimes be called partial thickness burns. Second Degree burns as we can see from the image below are much more severe then first as they cause a longer lasting effect and blistering. For the base of a second degree burn can be created the same as a first but with darker shading and colourings, depending on how the burn was made e.g. boiling water, fire etc. The blistering could be made by a using gleitien and latex to create the raised surface and a yellow body paint. I have find an example of a second degree burn done with make-up which is called ' Second Degree Burn - SFX Halloween Make-up Tutorial'


Third Degree Burns: 

- A third degree burn is a combination of first and second degree burns but instead the burn extends to all layers of the skin and causes deeper injury like possible loss of fluids, effecting tissue and cause shock. When creating a third degree burn with make-up, again you have to consider how the burn has been created to know how severe again the burn would look after. This kind of burn shown below we can see is quite a deep burn and has started to heal over so another point to take is how long a burn or any wound has been there for. I have found a video that shows an example of a third degree burn with make-up which is a lot of severe then the other kinds of burns. The video is called ' FX Make-up Series Third Degree fire burn'.  


Making your Burns with Make-up:

In relation to my research into different types of burns and have produce my own first attempt of creating a burn while using the reference photo above as a guidance. As this is a third degree burn I had to consider the depth to my make-up burn making it look raised on the skin. I would make sure I blend out the edges of the burn which will make the burn look even more deeper, I would do this by stippling red colours out around the edge to make it look faded. For this kind of burn we were taught how to use gelatin to create a burn. 

Kit:

- Bobby pins
- old brushes 
- spectacular 
- foundation
- foundation brush
- blood
- gelatin 
- Hair dryer 
- eye-shadow pallet 
- powder 
- bruise pallet
- supercolour pallet 
- latex
- which hazel  


1. To start creating your burn wound always start with a reference picture as this will help you make a more of a realistic burn. To start creating the burn prep the skin with the pro shield foam and then prep the gelatin. To do this cut up one cube of gelatin, put in a bowl and microwave for 30 seconds. Other options with gelatin is that you can add dyes to create different skin tones or even add textures e.g. glitter. You can also add gelatin to molds also for different shapes if wanted. When I had my gelatin prep ready I tested on my skin first to make sure not to burn my clients skin. When the gelatin was cool enough I then used the spectacular to place the gelatin onto the area of skin I wished to create the burn. When putting the gelatin on the skin I did find that it was quite hard to work with as it hardened quite quickly. If I was to used this again I would work faster with the product to smooth out the edges to make it easier to blend in with the skin. To speed up the drying process I used a hair dryer on a cool heat (not hot as it would melt) and then powdered it to take away the shine. Then finally I used the which-hazel and a cotton bud to blend out the edges to make it look more apart of the skin.

2. For the final steps I took some foundation that match the skin colour and used a foundation brush to blend this over the gelatin to make it match further to the skin. Then using a stipple brush and mixes of red supercolour and eye-shadows I stippled this all over my burn, making sure the outer edges were lighters reds to make it look more faded. I then used black eye-shadow to fill in all the little cracks within the burn and blended this out to make it appear bruised and also used yellow around the edges to make it look like an older burn. Finally to finish off the look for the burn I used some blood and a hair pin and filled in the gaps and also putting scab blood on as well.


Reflection: 

To improve on this look again I needed to work faster with the gelatin as it hardens very quickly when working with it. I needed to move the product around faster to create a more wrinkled skin effect and smooth it out at the edges this would have made the look much more realistic. I would like to create cuts/burns for my final look for my character on the body as I want my character (Mr. Hyde) to show him trying to escape from his body but on the other hand I would like to use gelatin to create a growth look up my characters face to represent Hyde taking over Dr. Jekyll's body. 

Saturday 13 February 2016

Monsters:

What is a Monster?

So in this blog I will writing about the question; What is a Monster?. To many of us a monster is something that should frighten us, a nightmare from our imagination, a horrible made-up creature etc. ' A monster is a distortion of something that has a normal, non- threatening form. The monstrous form is threatening and distrusting because it is beyond the pale of what we consider normality. A monster is a deformation of what we consider normal and therefore safe' - David Croneberg. I am writing about the study of monsters as this will give me a better understanding of what types of monsters there are and have been and why they were develop to be used in film and TV. This understanding of there background will inspire me within my work for my final design and give me a better understanding of the development of monsters over time. To start our understanding we mind maps our first thoughts of monsters and what came to mind.  


Werewolves: 

A werewolf is to first believed to be a human that has no control to changing into a werewolf when the full moon shines and having uncontrollable rage. There purpose is to kill everything in sight, regardless of their relationships as humans. The curse mean they lose all control and encounter bad attacks and events but as they wake as human they have no memory of their actions, if they do it would only be small memories thought to be dreams. However, there are other types of werewolves e.g. the original werewolf were a shape-shifting wolf that had no control over changing into a werewolf or it shape shifting power while also having human thoughts. Quoted from this blog 'Werewolves: Narrative and Symbolism in Film and Literature', she states that they are big difference in the representation of werewolves in literature and films. ' For example, in films werewolves are most often infected or cursed from being bitten or scratched by another werewolf. In Literature, they are cursed through a pact with the Devil or because they have a psychiatric illness; also in literature religious symbols are usually no protection. Whereas, for example, a pentagram was used in the film 'An American Werewolf in London'. Traditionally used as a symbol for protection, it is often misunderstood to mean something Satanic'.  This states that there are big changes in the way that werewolves(out of one of the monsters) has been represented differently through literature and film which again has also changed/adapted over time due to how people view things. 

Ghosts:

A ghost is another creature that is considered a monster it is a spirit of a dead person especially one that is believed to appear to the living bodily form or to haunt people or locations. In film and TV ghosts have always been haunting us for a very long time. I believe in some context they are meant to represents our fears, for example in Charles Dickson famous novel 'A Christmas Carol' scourge is being haunted by three ghosts; Past, Present and the future who are there while he is supposedly dreaming to warn him of his behavior and what this has done to his life. I believe the ghost firstly represent our fears or conscience to things we have done which in fact 'Haunt' over us until we solve it, making it go away. Another theory I have gathered about the representations of ghosts is that they represent greive and the idea of letting loved ones go after death. Ghost in most novels or films tend to come to us in dream making it almost show its a made-up imagination of another fear of death and letting go. Over all ghost I believe represent our fears of our inner conscience but on the other hand films are now portraying them as comical monster e.g. in 'Harry Potter', 'Sir Nicholas, the Gryffindor House Ghost.   


Monsters:

As we know already monsters are of all different kinds like shown in examples above but I will now be talking of monsters of a different kind that have been constructed by science which is more of a new theme when the industrial revolution happened. Monsters like this e.g. Frankenstein who where constructed by science from lots of different body parts and then released into a world that judged him. This was a main theme in a lot of films and novel with monsters like 'Edward Scirrorhands' as he was abandon very young and had to find his place in the world while being very different. A main theme consists in these films of trying to 'Fit-in' with society and its rules while being very different. Relating back to the industrial revoloutin was that when it happened science was a very new concept to explain why things happened instead of religion and people find this very difficult to understand. Therefore as human are people that don't take kindly to 'change' we always have found it hard to except new things we usually don't understand, like shown in these films and novels.   

Vampires:

A vampire is commonly known for being a dead corpse that reanimate to suck blood of sleeping victims at night. Which is what they were mostly first known as but this concept has changed a lot over time. The 'Vampire' first started off as an ugly and hideous rat like create that would crave for human blood in some of the original films and novels. However, today they are portrayed more as humans in disguise while appearing incredibly sexy and glamorous. A lot of the Vampire films gave a greater meaning to what they first portray to the eye, they tended to reflect the problems of the time e.g. in the 80's vampires where shown having sex, biting and blood giving the warning of AID's as this was a big problem then. The love, blood and boldly fluids where to represent that with lust there can be consequences like with AID and being killed by vampires. Therefore a lot of fears of the time of production was reflected through popular TV and Film. Not relating to vampires but the same concept of influence by time are the many apololictic and Zombie films and TV shows due to big events of death e.g. 9/11.   


Psychoanalytical approach to monsters:

In this part of the blog I will be writing about a piece of writing that I read which was about the 'Psychoanalytical approach to Monsters'. When reading this piece of writing I have to admit that I found it quite complex and that I had to re-read it to fully understand the kind of concept it was trying to portray. Some points that I gathered from this writing where that it used the representation of birth, not as a beautiful symbol of life but quite the opposite. The process of birth being more horrible as we have seen all the insides, guts, blood etc and stating that even though no-one remembers their own birth that we all have experienced this. Relating this to horror films and monster when we all watch horror films we all have a psychological relation to gory films as we can all relate even if we don't relies.