Make-up: How to Make Fake Burns
In this blog I am writing about the process of making your own SFX burns for TV and Films. In this lesson I learnt about the correct materials to use to produce a SFX burn in the professional place, how to colour it properly to make it look realistic and to always have a reference picture of the type of burn you are trying to produce in front of you. When making your own burn that is one of the most important rules to know how the burn was cause (for TV/film purpose), therefore to know what the burn will have to look like to make it realistic. As this is key to know for the industry I thought it would be appropriate to research into different kinds of burns e.g. first, second and third degree to give some examples.Your bodies biggest organ is the skin and is vital to the human body as it carries out very important functions in the body e.g. protecting vital internal organs and tissues, acts against infection and detects sensations like touch, pain, heat and cold. 'The skin is made up if three layers. The outer layer is called epidermis and is made up of five layers of cells which work their way up to the surface of your skin. The dermis (which is an underlying layer of fibrous tissue) is approximately 0.3-3mm thick. This is made up of a mix of three types of tissue. It also contains your hair follicles and sweat glands, as well as small blood vessels and nerves.The final layer is the subcutaneous fat or subcutis. This layer varies in thickness depending on the person. The subcutis contains your larger blood vessels and nerves. It also regulates the temperature of your skin and body.' ( BlondMcindoe, research Foundation).
First Degree Burns:
- First degree burns only affect the outer layers of the skin and usually cause pain, redness and sometimes swelling in the skin. These kinds of burns usually fade after a while as it only effects the top layer of the skin. When creating this kind of burn with make-up you always have to consider the type of first degree burn you wish to create e.g. like this sunburn shown below we can see that the person was wearing a vest top and when creating your own with make-up for film the type of clothing and length of time in the sun is something you would have to highly consider. For an example of how to create a make-up sunburn I have linked in this tutorial on how to create your own called ' Extreme Sunburn Make-up Tutorial (SFX!) QueenKingSFX'. This technique will be helpful for the future but it is not an appropriate technique for my character that I am going to create from my novel.

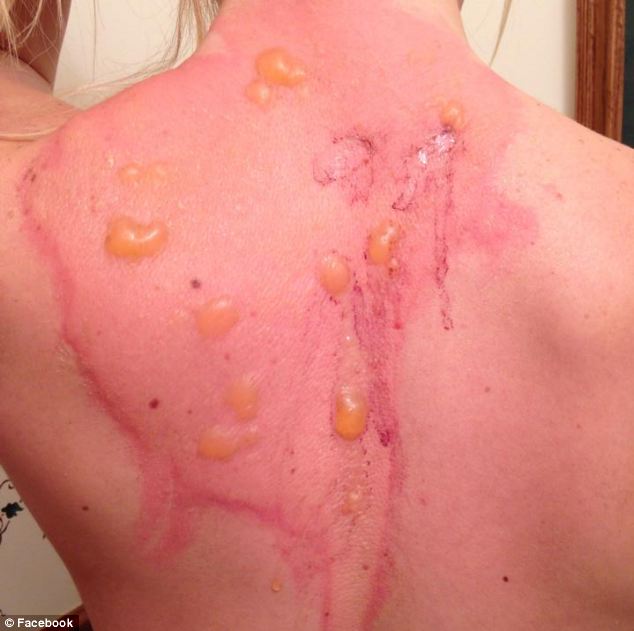
Second Degree Burns:
- Second degree burns affect the outer layer like first degree burn but as well affect the underlying layer of skin. They cause similar symptom like pain, redness, swelling but also blistering. It can sometimes be called partial thickness burns. Second Degree burns as we can see from the image below are much more severe then first as they cause a longer lasting effect and blistering. For the base of a second degree burn can be created the same as a first but with darker shading and colourings, depending on how the burn was made e.g. boiling water, fire etc. The blistering could be made by a using gleitien and latex to create the raised surface and a yellow body paint. I have find an example of a second degree burn done with make-up which is called ' Second Degree Burn - SFX Halloween Make-up Tutorial'.
Third Degree Burns:
- A third degree burn is a combination of first and second degree burns but instead the burn extends to all layers of the skin and causes deeper injury like possible loss of fluids, effecting tissue and cause shock. When creating a third degree burn with make-up, again you have to consider how the burn has been created to know how severe again the burn would look after. This kind of burn shown below we can see is quite a deep burn and has started to heal over so another point to take is how long a burn or any wound has been there for. I have found a video that shows an example of a third degree burn with make-up which is a lot of severe then the other kinds of burns. The video is called ' FX Make-up Series Third Degree fire burn'.

Making your Burns with Make-up:
In relation to my research into different types of burns and have produce my own first attempt of creating a burn while using the reference photo above as a guidance. As this is a third degree burn I had to consider the depth to my make-up burn making it look raised on the skin. I would make sure I blend out the edges of the burn which will make the burn look even more deeper, I would do this by stippling red colours out around the edge to make it look faded. For this kind of burn we were taught how to use gelatin to create a burn.
 Kit:
Kit:

- Bobby pins
- old brushes
- spectacular
- foundation
- foundation brush
- blood
- gelatin
- Hair dryer
- eye-shadow pallet
- powder
- bruise pallet
- supercolour pallet
- latex
- which hazel

 2. For the final steps I took some foundation that match the skin colour and used a foundation brush to blend this over the gelatin to make it match further to the skin. Then using a stipple brush and mixes of red supercolour and eye-shadows I stippled this all over my burn, making sure the outer edges were lighters reds to make it look more faded. I then used black eye-shadow to fill in all the little cracks within the burn and blended this out to make it appear bruised and also used yellow around the edges to make it look like an older burn. Finally to finish off the look for the burn I used some blood and a hair pin and filled in the gaps and also putting scab blood on as well.
Reflection:
To improve on this look again I needed to work faster with the gelatin as it hardens very quickly when working with it. I needed to move the product around faster to create a more wrinkled skin effect and smooth it out at the edges this would have made the look much more realistic. I would like to create cuts/burns for my final look for my character on the body as I want my character (Mr. Hyde) to show him trying to escape from his body but on the other hand I would like to use gelatin to create a growth look up my characters face to represent Hyde taking over Dr. Jekyll's body.
No comments:
Post a Comment